
Want more holiday inspired family crafts? Join Kensington on Facebook Live at 2:00 PM EST on 12/1!
Keep reading for a DIY project from Pat Esden we can’t wait to try!

Miniature holiday topiary trees are easy and inexpensive to make. They can also be personalized to fit anyone’s taste or decor. The one I’m going to demonstrate is a tree that would be enjoyed by Annie Freemont, the antique dealing main character in my Dark Heart series.
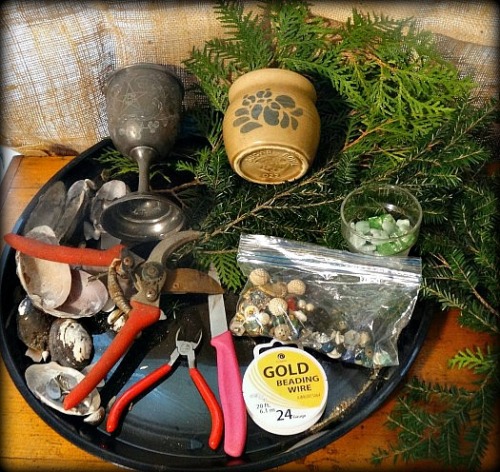
Supplies
- 1 Knife (Needs to be sharp, like a paring knife.)
- 1 Wire cutters
- 1 Garden clippers (For trimming evergreens.)
- 1 Block of Oasis Florist Foam (From craft store or florist. Styrofoam will not work for this.)
- 1 Container (Must hold water and have a 4 inch or less diameter opening.) Consider your container carefully. Clay pots with a liner to keep water from leaking will give a country look. Containers with a tall stem will give the tree the appearance of more height. Colored containers can match a specific decor.
- 1 Spool craft wire (24 gauge wire any color. Gold, silver, or copper will add sparkle to tree.)
- Evergreen clippings or branches (Balsam, juniper, and cedar are ideal.) This can be one variety of evergreen or a mixture. The addition of boxwood or fresh bay leaves looks amazing. These sprigs can be snipped off trees or shrubs in your own yard, or bought at a nursery or florist. Also branches trimmed off a Christmas tree can be used. Creating the topiary will take more evergreens than you might expect, so get about enough to fill a 3 to 4-gallon bucket. Better to have extra on hand than to run out.
- Decorations This is where your creativity and taste can really come into play, just make sure the decorations are items that can be attached to wires or come with their own stems. Light weight items smaller than a quarter are ideal, but this is really up to you. Think in terms of having a theme for your tree. My main character, Annie, is an antique dealer and the Dark Heart series takes place on the seacoast of Maine, so I’m going to decorate her tree with shells, sea glass, and also mismatched pieces of vintage jewelry and buttons. Your imagination is your only limit here.
Here’s a few suggestions to get you started: A sewing theme with buttons and bells made out of thimbles. A natural theme with tiny hemlock cones, pepper berries and dried flowers. Hershey kisses and wrapped candies that can be removed and eaten. Stars and a garland of tiny lights. Paper flowers made out of book pages and an origami star.
Creating Your Topiary
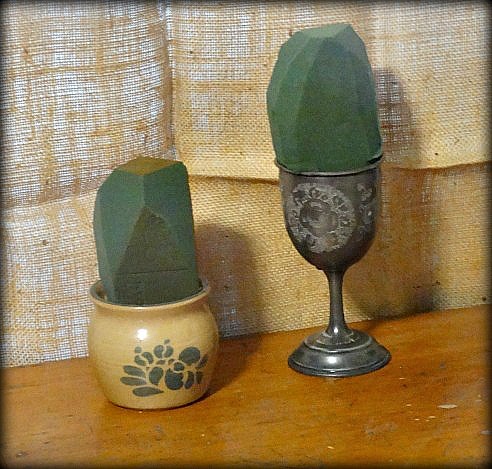
Step 1
Half-fill your kitchen sink with water and float the block of oasis foam in it until the air bubbles stop coming from the foam and the block sinks. This should only take a few minutes. Once the foam is soaked, cut a tall rectangular piece that will fit tightly into your container and stick out of the top (see photo). It’s vital that it fits snuggly and can’t fall out. For size comparison, the photo below shows a third of a block of Oasis in both a sugar bowl and in an antique chalice. Now trim the foam until it vaguely resembles a cone with a flat top.
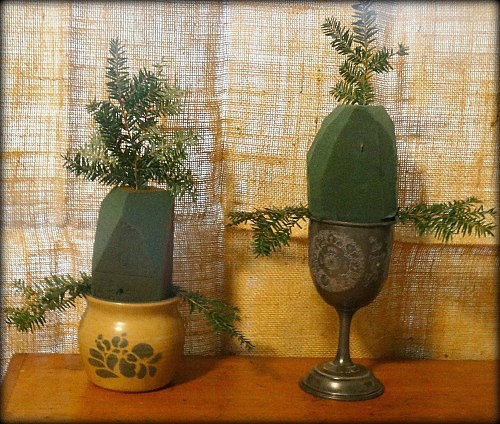
Step 2
Prepare a dozen sprigs of evergreens that are approximately 3 to 5 inches long. Make sure the bottom inch or so of the stems are cut at an angle and free of needles to make them easy to insert into the foam. Shove a sprig into the foam so it lays flat and rests on the top of the container (see photo). Push another sprig that is the same length into the opposite side of the foam. This will show you how wide the bottom of your topiary tree will be when its finished. Now shove a sprig straight down into the flat top of the cone. This will be your height. From here, it’s a matter of using your widths and height as guidelines as you prepare more sprigs and spear them into the foam. Try not to add sprigs, then pull them out to reposition. This can weaken the foam and may cause it to fall apart. Instead, prune the topiary after it’s complete to get rid of wayward pieces. However, unpruned snippets of greens will look nicer and not ooze sap.


Step 3
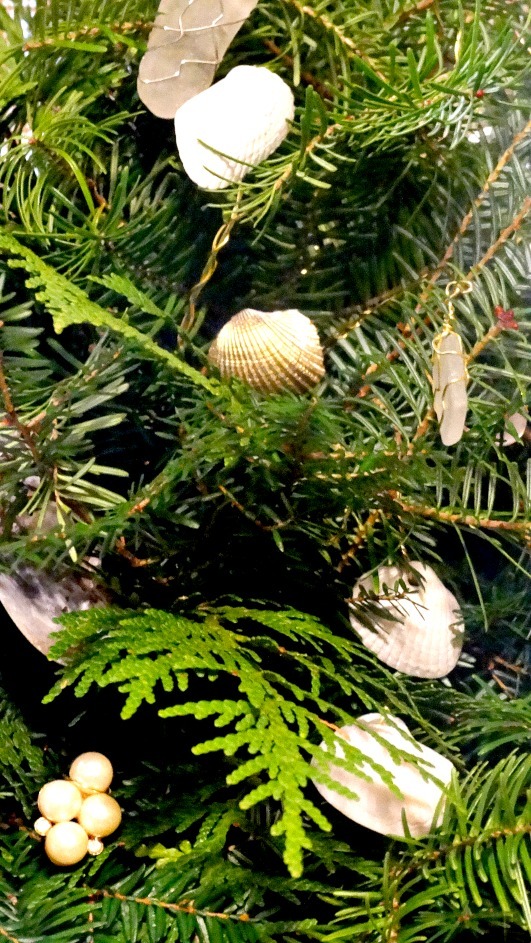
Adding decorations
You can make tiny wire hooks to attach decorations, like the way you hang balls on a Christmas tree. Or you can attach the decorations to a longer wire and spear the wire into the foam (See photo). These longer wires will need to be double thickness to make them stiff enough and a little longer than your evergreen sprigs. Most likely you’ll end up using both these techniques. The key is to make sure the decorations won’t fall off when you move the tree.
If you want your tree to have extra glitz, then you can spray some of your decorations with metallic spray paint, like I did with some of the shells that I used on Annie’s tree.

Care and Handling
A topiary can last for weeks if you move it daily to a cool location when you’re away at work or not home to enjoy it. A refrigerator or cool basement will work great for this. The ideal cool storage temperature would be 35-45 dgrees Fahrenheit. Watering will also help it last longer. The easiest way to do this is to place it in the sink and use the sink’s spray attachment to mist it all over. This should be done every couple of days to keep the foam wet and the greens fresh. A hand mister can also be used.
Bonus: To easily remove evergreen pitch from your hands, apply hand cream before making the topiary and afterwards wash with a soap or cleaner that has an ‘oil’ base, such as Murphy’s Oil Soap.
Enjoy and happy holidays!
 Uncover the Truth With These New Mystery Series